How to Build The Best Charcuterie Board
The humble charcuterie board has transformed from a traditional French appetizer into an aesthetic and gastronomic sensation, displayed on tables across the United States with an arrangement of cured meats, cheeses, fruits, and condiments. The term "charcuterie" itself is derived from the French words "chair", meaning flesh, and "cuit", meaning cooked. The modern conception of charcuterie was invented in France in the 15th century, referring exclusively to an assortment of meats including ham, salami, savory sausage, and paté. The board serves as a reflection of the craftsmanship of local charcutiers, the expert butchers who practice charcuterie.
Despite their meat-only origin story, American charcuterie boards have evolved to include an eclectic mix of elements including meat, cheese, fruit, nuts, and spreads. Considering that the etymology of the term "charcuterie" refers solely to meat, the American interpretation may be better described as a cheese plate due to the additional food pairings. However, "charcuterie board" has become a blanket term in the United States attached to a growing trend. Amidst the rise of foodie culture and the appeal of charcuterie board aesthetics on social media, the hashtag #charcuterieboard has amassed roughly 2.5 million results on Instagram. Ranging from holiday-themed creations to simple weekend appetizers, building a board has become a new art form.
Marissa Mullen, @thatcheeseplate on Instagram, is even widely recognized as the first "charcuterie influencer" and is celebrated for her "Cheese By Numbers" method to simplify building a board. By dividing the board into quadrants and separating the cheese plate into its individual components - cheese, meat, produce, crunch, dip, garnish - the method provides a systematic approach according to which the board builder adds each element in the same order to each quadrant. Swipe through the Instagram post below to see the "Cheese By Numbers" method in practice!
Whether hosting a party, an intimate gathering, or spending a weekend solo at home, the allure of a charcuterie board lies in the fact that one can engage in a relaxed grazing of delicious bites. By combining an appealing array of colors, textures, and tastes, the charcuterie board creates an experience of personalized, artful consumption. Now that we've explored the roots and variations of charcuterie, let's delve into 3 steps for building your best charcuterie board.
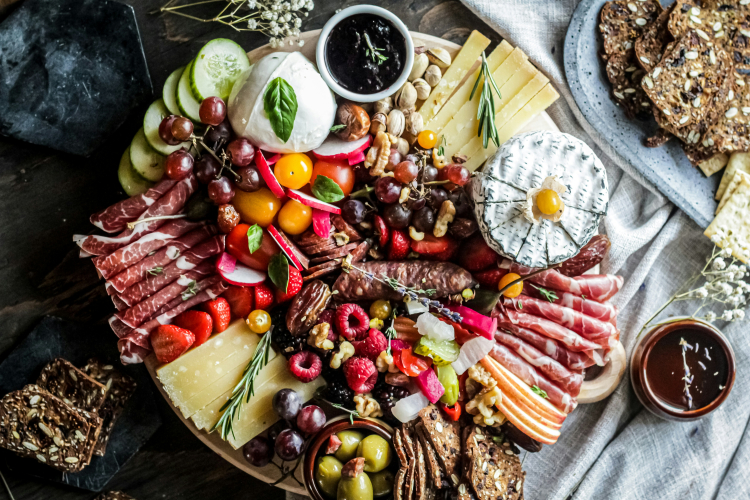
Step 1: Choose your meat and cheese
Image Credit: Caroline Rispoli
Depending on the size of your board, select 3 to 5 types of cheese. It's recommended to choose a variety of milks - cow's, sheep, goat - and a variety of textures - hard, semi-hard, soft, semi-soft. This assortment provides an opportunity for a mix of flavor profiles on your board. In the above example, I used: camembert, a soft cheese made from cow's milk; chèvre, a semi-soft cheese made from goat's milk; manchego, a semi-hard cheese made from sheep's milk; and provolone, a hard cheese made from cow's milk.
After choosing your cheeses, pick 1 to 3 meats ranging in flavor from mild to spicy. I used spicy salami, mild salami, and mortadella. In terms of presentation, the fan method is a simple layering tactic that can be presented flat on the board, as shown above by the salami. I also folded my meat to create a fun visual effect similar to a flower, as shown by the mild salami within the circle of camembert.
Step 2: Add crunchy accompaniments
Image Credit: Caroline Rispoli
Include items like olives, pickles, nuts, and crackers for a satisfying crunch! These elements bring a crisp texture to the board that contrasts perfectly with a creamy cheese such as camembert or the semi-soft chèvre.
Step 3: Finish with fresh produce
Image Credit: Caroline Rispoli
Incorporating fresh fruits and vegetables can help balance the richness of the meats and cheeses, as well as fill any aesthetic gaps on your board. Sliced apples, figs, or berries are popular choices for a refreshing burst of sweetness. Veggies such as carrots or tomatoes add a fun pop of color, and sliced cucumbers serve a dual purpose by acting as a palate cleanser between bites.
Step 4: Eat and enjoy
The best part about building a charcuterie board? Taking your first bite!